
Quick launch
New to the moon? Welcome! Here's six steps to get you moonwalking in no time!
Moon Smart Focus Quick Launch Guide
Welcome to a concise overview for getting started with your Moon system.
Below you’ll find detailed explanations of the app modes, main view, and core features that ensure smooth setup and fast operation on set.
- Fast-start guide for using the Moon Smart Focus App
- Learn the four main modes: Spot, Nearest Point, Person, and Nearest Person
- Overview of main view controls — fan, potato mode, auto, and more
- Ideal reference for operators on set
- Moon Start Focus Quick Launch, learn the essentials in minutes
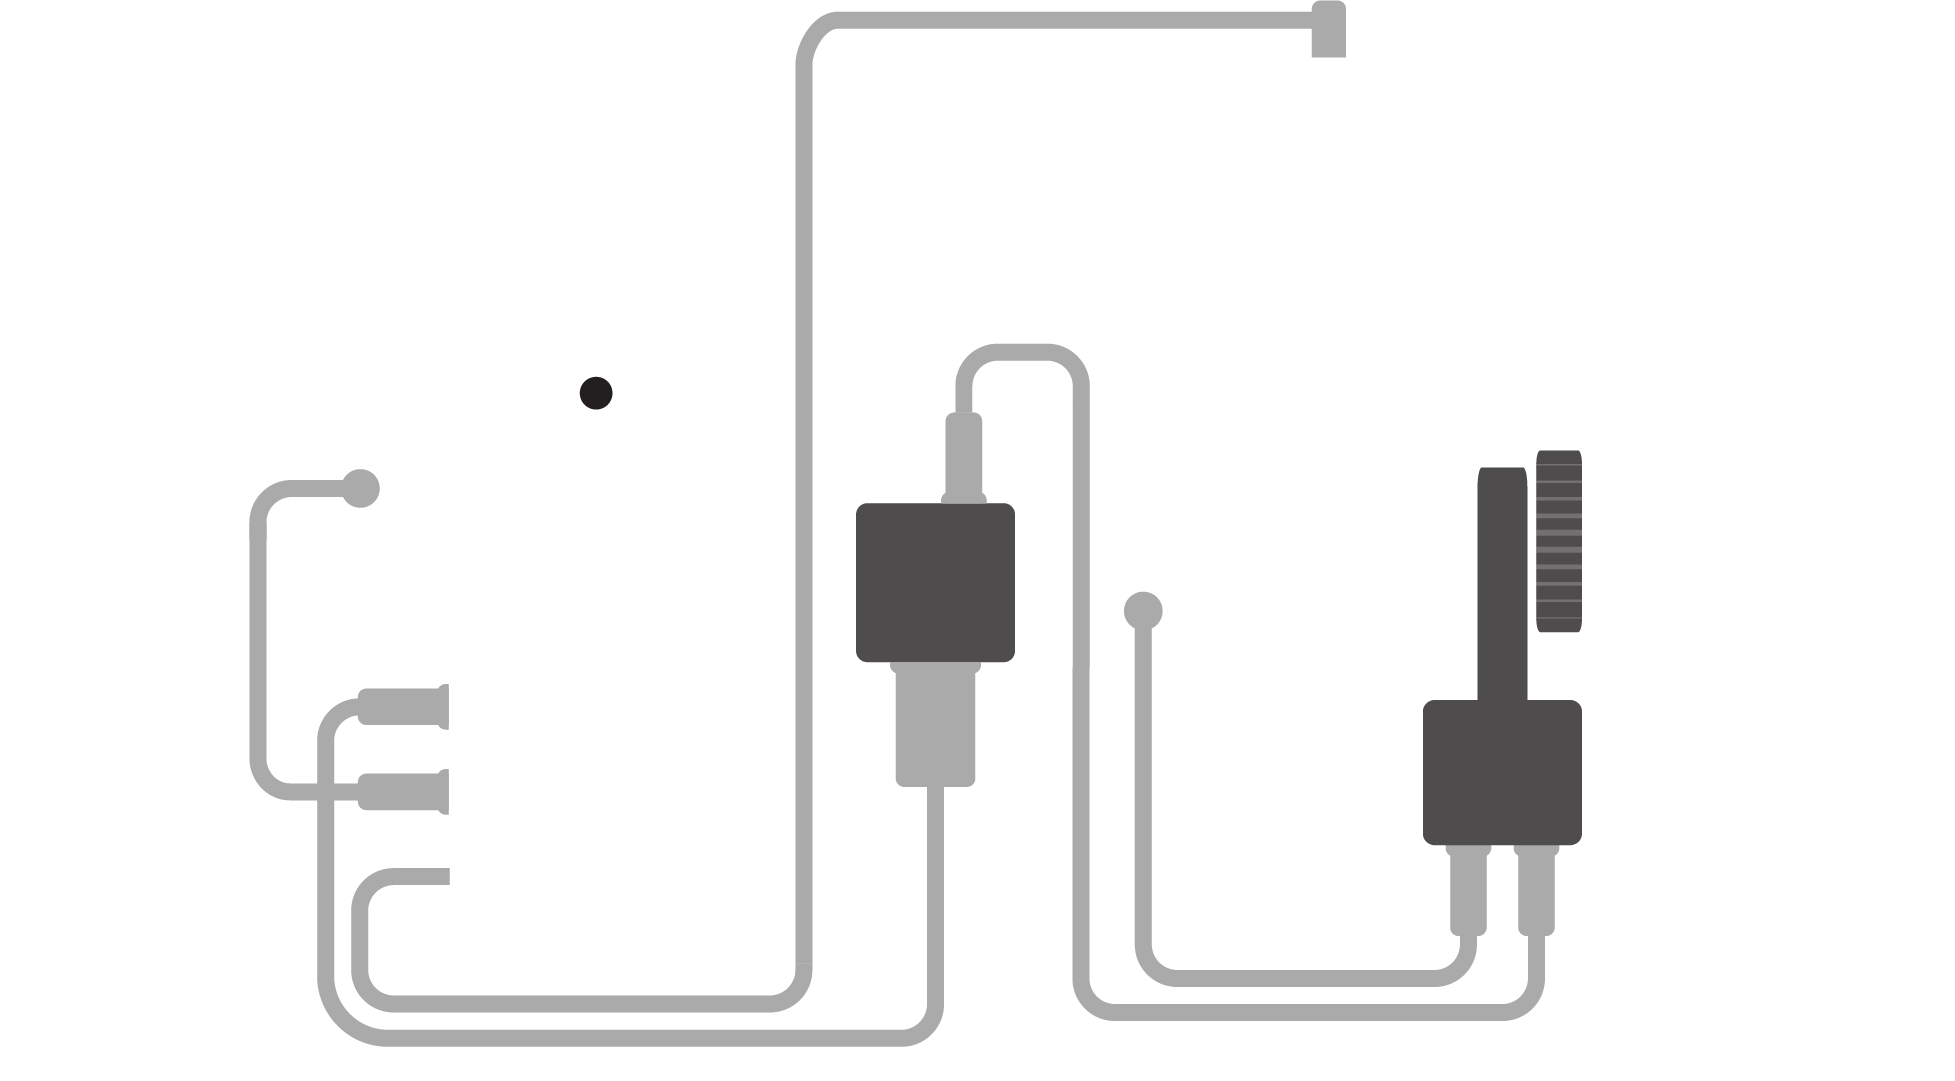
01. Moon Brain
- Mount the Brain on your camera, preferably not too close to a videotransmitter.
- Connect the Eyes to the Brain with the custom USB-A to USB-C Eyes cable.
- Power the brain from a RS-connector if your camera has one (if not use the d-tap cable to power straight from a battery).
The Brain is the heart of the Moon Smart Focus system. It’s a powerhouse processor making our AI magic possible, as well as a wifi hotspot for communication with your Moon Controller (iPhone).
Powering the Brain
How much power the Brain uses depends on what mode it operates in. Calculating the distance to multiple persons means a lot more computing than figuring out the distance to a nearest point, for instance. Peak power usage is 35 W (20-25 W on average in Person mode). The Brain accepts 10-30 W and draws 1-3 A.
Read more...
Because of this we recommend to power the Brain from a 24 V RS connector. Many cameras limit the current to 2 A on 12 V connectors, which can mean problems for the Brain. This also lets you take advantage of the ”Set fan to quiet when camera runs” function if supported by your camera. If the camera you are using does not have a RS connector a good option is often to power the Brain straight from the camera battery.
A tip regarding D-tap: It is often a good practice to plug in the D-tap connector first to avoid power spikes and possible damage to internal circuits. Likewise when unplugging, disconnect the D-tap connector last.
The Moon Smart Focus system behaving strange (or shutting down automatically) can be a sign of it not getting sufficient power. Before this happens the LED by the power connector will turn red and you will also get a power warning in the app.
Good to know: Some older Tilta camera cages with power distribution will not deliver sufficient current for the Brain. A solution can be to power straight from the camera battery (if you don’t have the option to switch to another cage).

Updating the Brain
Updating the Brain will normally take around 30 minutes.
- Connect the brain to an ethernet network with internet. You find the ethernet connector under the lid that is held in place by a magnet just above the connectors on the side of the Brain.
- Open Settings in the app (double-click on the button to the bottom right). Then choose SOFTWARE UPDATE under HOUSTON.
The Moon app will automatically check if there is a newer software version available when you go into SOFTWARE UPDATE. If so you will be given the choice to update, if not it will tell you that your system is up to date. To update choose PERFORM UPDATE and then START UPDATE.
Read more...
It may take the app some time to recognize and establish an internet connection. If it says it does not have a connection and you know it’s connected to the internet, be patient: Go back in Settings, wait a minute or two and then go into software update again. You might need to repeat this one or two times.
When you choose START UPDATE two progress bars will appear, one showing the progress of downloading and the other installing the new software. The update process consists of two steps. Step one takes approximately 15-20 minutes (exact timing depends on how much is new in the new version compared to the last time you updated, as well as the speed of your internet connection of course). Let the process continue even if both bars get full, the app will automatically start step two as soon as step one is fully downloaded and installed. Step two generally takes less time to finish (normally 5-10 minutes).
After step two the Brain will automatically restart. This can take a couple of minutes, when the Brain is up again you are good to go! If the Brain does not seem to start, your controller iPhone may have jumped onto a different wifi network. Go inte settings on the iPhone, then wifi and choose the Brain’s wifi.
Updating using another iPhone for internet connection
- Check that the iPhone you want to use is set to ”Allow Others to Join” under Personal Hotspot in the iPhone settings.
- Connect that iPhone to the Brain using a Lighting to USB-A cable. You find two USB-A connectors under the lid that is held in place by a magnet just above the connectors on the side of the Brain, you can use either one.
The iPhone you use for internet connection needs to have a working SIM card in it, however you can log onto a wifi network with internet connection and it will then download the update over wifi.
Read more...
If you do not do this and choose to download over your mobile data network we recommend having an unlimited mobile data plan with your service provider. The update is normally several gigabytes big and can easily use up all your mobile data and/or cost you a lot of money.
When you connect the iPhone to the Brain you will be asked if you ”Trust This Computer?”. Click ”Trust” and then you probably will have to enter your PIN code.
Now you can start the Moon App on this phone (or go to moonsmartfocus.local in a browser on the phone). Then proceed with the update process just as you would using an ethernet connection (described above). You start by choosing SOFTWARE UPDATE under HOUSTON in settings.
Power cables in the case:
- 1x 40cm/15.7 inches D-tap to 3-Pin Fischer
- 1x 40cm/15.7 inches 3-pin Fischer to 3-Pin Fischer
02. Moon Eyes
- Mount the Eyes co-planar to your camera’s focal plane.
- Connect them to the brain with the custom USB-A to USB-C Eyes cable.
The Eyes are the sensor of the Moon Smart Focus system. They use a stereoscopic camera together with an IR projector (used in low light situations) to create the depth map that is used for distance measuring. They are typically mounted on the camera above the lens.
There is a 1/4” female threaded hole with a 3/8” adapter screwed into it on the backside for mounting.


To avoid parallax issues (making measurements less accurate) it is important that the Eyes are mounted co-planar to your camera’s focal plane. They should not tilt up or down (or pan to the left or right) in relation to the focal plane, as this will affect the depth map the stereoscopic camera creates. The Eyes tilting and panning together with the focal plane, as it inevitable will when the camera moves, is of course totally fine.
Orientation of the Eyes on the horizontal axis does not affect measurements, but might affect the detection of persons in PERSON and NEAREST PERSON modes. We recommend keeping it level.
For instructions on setting the offset of the Eyes to you camera’s focal plane, see the section on offset below!
More about mounting the Eyes
An easy way to ensure that the Eyes are co-planar to the focal plane is to mount them straight onto the front part of the top handle of your camera using a mini quick release plate (as from Kondor Blue, Lenz Cameratools, 16x9, etc.).
Read more...
If you are on a longer lens and want the Eyes closer to the matte box, maybe use a top handle extension? However keep in mind, the systems minimum focus distance is 35 cm/13.78 inches so you might be better off mounting them not too much to the front.
Another option is to use a rangefinder mount on 15 mm rods, or you can of course also use a Noga arm - though then you need to take more care with the orientation of the Eyes so that they are co-planar to your camera's focal plane.
Eyes cables in the case:
- 1x 50 cm/19.7 inches USB-C to USB-A Eyes cable
- 1x 1 m/39.4 inches USB-C to USB-A Eyes cable
03. Connecting to Moon Hotspot
When powering up the Brain it will create a wifi network with the name moon-xyz, where XYZ is the name of the Brain, also written on its back. By the way, all our Brains are named after different moons, planets or stars around space. There you go, a fun fact!
When you turn on the iPhone that comes with the system as your Moon Controller it should automatically connect to this network. If for some reason it does not, go into the iPhone settings and choose it. The password is moonsmartfocus, in all lowercase letters.
Now start the Moon App.
04. Setting the offset
For Moon Smart Focus to give correct distances you have to tell the system how far from your camera’s focal plane the Eyes are mounted.
Open Settings in the app (double-click on the button to the bottom right). Then choose EYES under SETUP and scroll down slightly. Enter your offset value under Focal plane offset. The value should be positive if the Eyes are mounted in front of the focal plane and negative it they are mounted behind the focal plane. With the latest Moon software update you do not need to save, parameters are saved as soon as you change them. With previous software updates, do not forget to press SAVE or SAVE & MAIN just below the section where you entered the offset value!

05. Connecting to a lens control system
Generally this is what you need to do:
- Connect the Brain to your LCS with a custom serial cable.
- Choose the correct serial protocol in settings in the Moon app.
Moon Smart Focus currently works with these lens control systems:
It is actually possible to connect to any lens control system which accepts serial input from range trackers/distance measuring systems. Our aim is to support all systems on the market. Tests and development are ongoing. We are also constantly working on deeper integration with many of the most popular lens control systems.
You specify the serial cables you want when you buy the system (or rent it from your rental house).
06. Moon App
Modes
The Moon App has four modes for different shooting situations. Feel free to play around with the different modes and settings to familiarize yourself with the system. It’s the best way to learn!
SPOT
Click on a spot in the Moon View and instantly get the distance to that spot. The system will also track the pixels you clicked on if they, or the camera move. This might be useful for keeping the focus on a product, or any other object.
NEAREST POINT
In Nearest Point mode you get the distance to the nearest point inside a defined area. You can resize this area and move it around as you like. You can also add multiple areas for multiple distances simultaneously.
PERSON
The system will find every person it sees, give the distance to that person’s eyes and track them. To send the distance of a person to your lens control system, click on that person’s label. It will then become green and the system will track the person you selected.
NEAREST PERSON
This mode works similar to Person mode, only the system automatically selects the nearest person it finds. You can change this to the second nearest person, third nearest person, etc. by clicking the arrows to the far right.
Main view
The main view, your own Moon control center, also gives you quick access to a couple of other convenient functions.
FAN
Click to set the Brain fan to Quiet mode and click again to go back to normal. This is also done automatically when your camera goes into record if the Brain is powered from a RS-connector on the camera. No need to worry yourself about the degrees, the Brain will turn itself off if gets too hot. Temperature control is fully automatic, though good to know probably that if the Brain gets hotter than 90 degrees Celsius / 194 degrees Fahrenheit performance will start to be affected, frame rate will go down etc.
POTATO MODE
Going into Potato mode will cut the resolution of the video being streamed by approximately 75 percent, some would say making it look like it was shoot with a potato :) However this does not affect the depth map and measurements will be as accurate as before. A life saver if you start to experience wifi interference just before a take! Cutting resolution this much will usually solve lagging wifi.
AUTO
This button is only visible when you have the Moon Smart Focus system connected to a Preston or Tilta lens control system. You then toggle autofocus on and off by clicking it.
CONTROLS
Here you can turn on and off tools like a distance scale, a slider for quickly defining tracking depth, an interface for changing the exposure and a tracking region area for quickly excluding parts of the scene. You can also open SETTINGS by clicking the Settings button that you find just above the Controls button after clicking on it (or use our clever shortcut to open Settings by simply double-clicking the Controls button).
READOUT
The green distance in the upper right corner is the distance being sent to your lens control system. If you click on it the app will display that distance in full screen. Click again to go back.
To change between metric and imperial values open Settings, then go to INTERFACE under SETUP and choose what you prefer under Units.

Need support?
Just give me a call and we will help you out.
